Cues, Questions, and Advanced Organizers
16) Anticipation Guides
Basics
Time: 10-20 minutes
Classroom Arrangment: any
Materials: workpage
Process InstructionsGuides are introduced before reading to peek student interests and give purpose for reading.
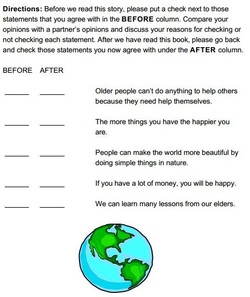
1. Teacher creates guide. Statements and questions included in guide should activate students prior knowledge, make them curious about reading, and make predictions about what they will be reading.
2. Students fill out guide. Depending on the class, content, and nature of the questions, students may discuss their different answers.
3. Students read passage.
4. After passage is read, students go back over the guide and re-answer the questions or make different comments.
Example
view image
Source: (Duffelmeyer,1994)
Time: 10-20 minutes
Classroom Arrangment: any
Materials: workpage
Process InstructionsGuides are introduced before reading to peek student interests and give purpose for reading.
1. Teacher creates guide. Statements and questions included in guide should activate students prior knowledge, make them curious about reading, and make predictions about what they will be reading.
2. Students fill out guide. Depending on the class, content, and nature of the questions, students may discuss their different answers.
3. Students read passage.
4. After passage is read, students go back over the guide and re-answer the questions or make different comments.
Example
view image
Source: (Duffelmeyer,1994)
17) KWL Chart

Basics
Time: 10-30 minutes
Classroom Arrangement: varies
Materials: student KWL charts, and large KWL chart
Process InstructionsK- What students know; activates prior knowledge.
W- What students want to know; peeks interests and give purpose to reading
L- What students learned; reinforces what they have learned.
1. Give every student a KWL chart and tell students the topic they will be filling out the chart for.
2. Each student fills out their own chart for the “K” section. Then the whole class comes back together to fill out the classes “K” section.
3. As a class, discuss what they want to learn from the lesson or questions they have about the topic to fill out the “W” section.
4. After the lesson, revisit the chart and discuss what was learned. Make sure to go over the “W” section to see if any questions were answered.
Example
View image
Source: (Tarquin & Walker,1997)
18) Elkonin Boxes

Basics
Time: 3-10 minutes
Classroom Arrangement: any
Materials: workpage
Process Directions
Elkonin boxes help students who are learning to spelling or are struggling to spell by focusing on individual syllables.
1. Pronounce a target word slowly, stretching it out by sound.
2. Ask the child to repeat the word.
3. Draw "boxes" or squares on a piece of paper, whiteboard, or individual dry erase board with one box for each syllable or phoneme.
4. Have the child count the number of phonemes in the word, not necessarily the number of letters. For example, wish has three phonemes and will use three boxes. /w/, /i/, /sh/.
5. Direct the child to slide one colored circle, unifix cube, or corresponding letter in each cell of the Elkonin box drawing as he/she repeats the word.
Example
view image
Source: (Griffith & Olson,1992)
19) Word Wall

Word Wall (reading rocket)
Basics
Time: depends on activity and is used multiple times throughout the year
Room Arrangement: large wall space
Materials: Chart paper, markers, pens, pencils
Process Directions
-Make words accessible by putting them where every student can see them. They should be written in large black letters using a variety of background colors to distinguish easily confused words.
-Teachers and students should work together to determine which words should go on the word wall. Try to include words that children use most commonly in their writing. Words should be added gradually — a general guideline is five words per week.
-Use the word wall daily to practice words, incorporating a variety of activities such as chanting, snapping, cheering, clapping, tracing, word guessing games as well as writing them.
-Provide enough practice so that words are read and spelled automatically and make sure that words from the wall are always spelled correctly in the children's daily writing.
-New information should be added on a regular basis.
-Use content-area material from the curriculum rather than randomly selected words.
-Word walls should be referred to often so students come to understand and see their relevance.
Example
When adding new words to the word wall, students will first;
-see the word
-say the word
-chant the word
-write the word
-check the word
Then I will add the word to the wall.
Source: (Eyraud, Giles, Koenig, & Stoller,2000).
20) Room Decorations

Basics
Time: this can take a considerable amount of time depending on how much a teacher decides to decorate
Room Arrangement: room arrangement does not necessarily have to change, it is the decorations in the room that change
Materials: anything needed to make the decorations
Process Directions
- The night before students start a new unit, the teacher decorates the room with the theme from the next unit.
- This can be as simple as putting up a new poster board, or as complex as creating a jungle; hanging vines from the ceiling, bringing in real plants, and placing stuffed jungle animals around the room.
-Students will walk in the morning of the new unit and be excited to start the new unit. The decorations should also give them some indication of what they will be learning in the lesson.
Example
In the reading corner, as books change to stay relevant to what we are learning, so will the decorations in the reading corner. View the image of a jungle themed reading corner. I did not create this corner, but I will do something similar.
Source: (Marzano, Pickering & Pollock p. 113, 2004)
21) Picture Walk
Basics
Time: 1-4 minutes depending on the length of the book
Room Arrangement: any.
Materials: a picture book
Process Directions
-This simple strategy should be taught to students so they can complete it on their own before reading a new book.
-Students are to look at the pictures in the book before reading it. As they look at each picture they try to imagine what the text may say and the possible vocabulary.
-After looking at each picture in the book and inferring about what the book may be about, they then read the book.
-This can be done individually, in small groups, or as a class. If done in groups or as a class, students should share what they are thinking about when they see the pictures.
Example
I plan to use this strategies with guided reading groups. Previewing the material will give students cues as to what they vocabulary may be and therefore they will read more fluently.
Source: (Kelley & Clausen-Grace, 2008).
22) Anticapatory Sets
Basics
Time: 1-5 minutes
Room Arrangement: any
Materials: depends on the specific lesson
Process Directions
- Anticipatory sets are questions, stories, interesting facts told to students right before the lesson to get them thinking about the topic.
- These sets should be exciting and interesting so students are fully engaged in the lesson.
-The set should include information about the lesson and a question that students should be able to answer at the end of the lesson.
Example
See example in Two-Thirds or Three-Sixths lesson under the "Lessons" tab.
Source: (Wolfe, 1998).
